• Skip to primary navigation
  • Skip to main content
  • Skip to primary sidebar

Training Profits

Learn How To Create An Online Course

  • START HEREHow it works
    • How It Works
    • > HOME
  • COURSESLearning For Trainers
    • Training Profits Course
    • Filming Profits Course
    • > All Training Courses
  • PRODUCTSStuff To Help You Succeed
    • The Training Manifesto
    • Training Profits Book
    • Training Templates
    • Green Screen People
    • Sell Your Courses
    • > All Products
  • RESOURCESMy Recommendations
    • Linktree
    • Kit & Resources
      • My Training Kit
      • Training Tools
      • Training Resources
      • Training Profits Merch
      • Free Guides
      • Free Videos
      • Course Creators Newsletter
      • Course Creators Association – coming soon
      • Free Webinars – coming soon
You are here: Home / Archives for Training Guide

Training Guide

How to Edit a Video in Adobe Premiere

By Leigh Burke on April 1, 2019

Are you are interested in learning video editing at your own convince, are you planning to create the first video for your own YouTube channel or you want to create a promotional video for your own brand to promote and market it but you don’t have enough budget to buy video editing services?  Then do read this tutorial it is for you!

As today we are living in a digital world, to be successful and stay on the track with ongoing trends learning it is necessary to earn as many new skills as possible. 

With that being said, video editing has almost become an essential skill to be learned not only in our professional lives but also in our daily tasks, for example, to provide instructions on a specific task, to create a surprise birthday wish video for your friend and the list goes on.

Getting started with Adobe Premiere Pro is much easier than you think. Here a few basic instructions on how to start your journey of video editing projects using Adobe Premiere Pro.

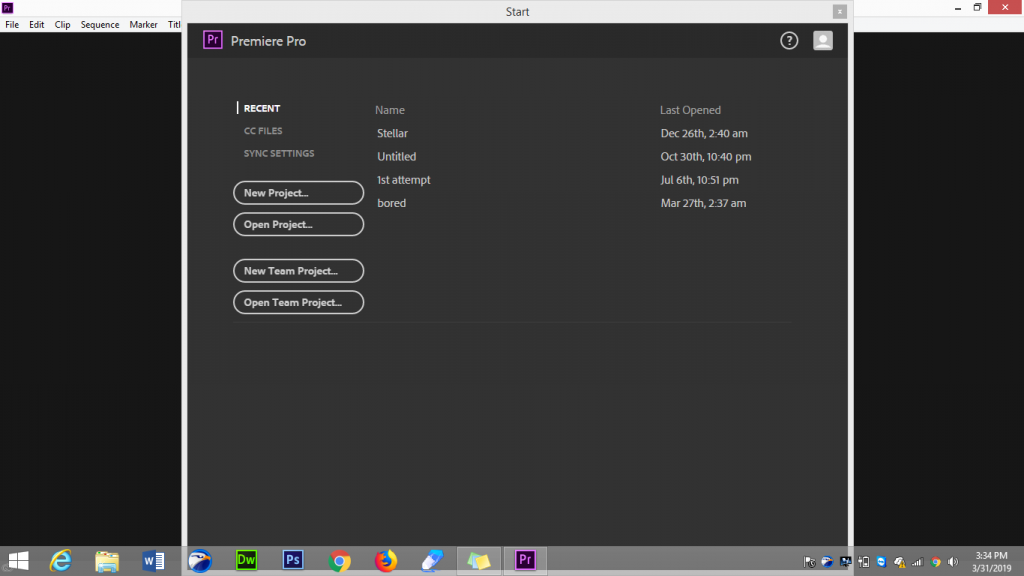
Create a New Project

When you open Adobe Premiere Pro, you will be asked to create a new project or open an existing one

  • Tap on the new project
  • Create Title of your project
  • Save it to your desktop for later use

.

Import Files

Now that you’re done with saving your file, next step to get started with Adobe Premiere Pro is to import media/files such as video clips that you want to edit and in order to do that:

  • Go to the top left corner
  • Tap on File
  • Tap on Import to and add files from your desktop library

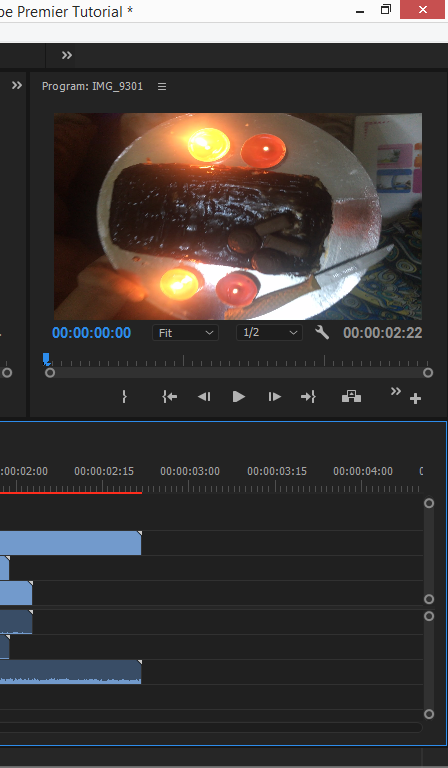
Build A Sequence or Timeline

A sequence is where video clips are produced or/and edited or in simple words, your Adobe Premiere Pro workspace.

 Suppose that you have 3, 4 or more video clips want to combine. After you have imported these clips you can build a sequence by simply dragging the videos in the Sequence or Timeline.

Here you can Add, Crop, or Add Audio clips by moving the pointers to your desired video parts or durations.


Preview Pane: You can also preview the changes you made in the timeline pane by going to the preview pane that is located just right above the sequence/timeline pane.

Add Text: 

You can add text such as title, time, date, names, quote or anything to your video clips. To do that:

  • Go to the center of the top ribbon
  • Tap on editing
  • Tap on Add text

Add Audio/Video Effects

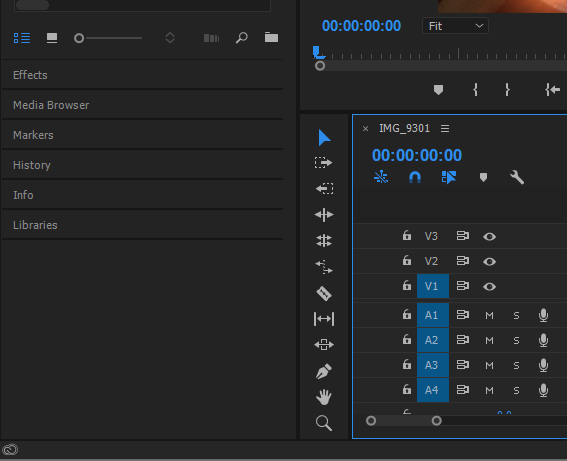
You can add a range of audio and video transition effects. All you have to do is to navigate to the “Effects” tab which is located at the bottom left of the Sequence Pane and here you can experiment different transitions effects and add the one which is best suited for your clip.

Finish and Save or  Export

Once you think you’re done editing the video to the fullest and it looks just perfect, then it is time to wrap it up and save it in your PC or Desktop.

  • Go to File on the top left
  • Tap on Save As
    or
  • Tap on Export
  • Choose the location on your pc and hit ok

Pro Tip: Use Templates

If you’re new to using Adobe Premiere Pro then to make it a lot more easier you can also download and use  pre-built Adobe Premiere Pro Templates which are often provided by any third party companies.

The Quick Execution Method

By Leigh Burke on April 1, 2019

The Quick Execution Method is a methodology that enables the practitioner to quickly, efficiently and effectively execute on tasks, goals, quests and plans.

The methodology consists of 4 distinct phases that work in concert with one another, and can be iterated to achieve continuous improvement in delivering products or services. The 4 phases are:

  • Brainstorm – This is where you brainstorm the initial idea and take notes. Check out competition, product/service names, domain name availability etc.
  • Design – This is where you design what you are creating. Whether or not it’s a product, service or just a one off document you are producing or task that needs completing.
  • Execute – This is the most important phase. You set a deadline, develop your action plan, track your progress, develop your product or service, then launch to the world.
  • Manage – This is how you manage your product or service after you have launched. If it was a task or one off document you were producing, then this would be the follow up steps to support your client.

As you can see the methodology can be used to track smaller tasks and projects or development of larger products and services. Iterate through the phases as required to achieve continuous improvement.

Download Xmind mind mapping software to edit the Awesome Productivity Method mindmap.

Here is the Quick ExecutionMethod mindmap source file.

Click the image below to see a larger version.

The Awesome Productivity Method

By Leigh Burke on April 1, 2019

The Awesome Productivity Method is a methodology that enables the practitioner, with the use of several free apps and online services as well as a notebook and folders, to achieve focused execution by freeing up the mind.

Each app has a specific purpose detailed in the execution plan below. The philosophy behind this method is that the applications take the mental strain off your brain having to remember “details and facts” and frees you up focus on executing on your tasks, goals, quests and plans.

Focused execution allows you to quickly and easily complete:

  • Specification – What exactly are you doing?
  • Automation – Automate as many of the tasks as you can
  • Repetition – Create frameworks, guidelines and procedures for repeatable tasks
  • Outsource – outsource anything that can be produced virtually following your frameworks, guidelines and procedures
  • Isolation – Isolate yourself to focus 100%
  • Elimination – Eliminate all distractions
  • Full Immersion – Fully immerse yourself in the task at hand
  • Quick Execution – Execute quickly using the Quick Execution Method

Download Xmind mind mapping software to edit the Awesome Productivity Method mindmap.

Here is the Awesome Productivity Method mindmap source file.

Click the image below to see a larger version.

How To Use Trello To Manage Your Projects

By Leigh Burke on March 31, 2019

What’s Trello?

Trello is the coolest and an easy to use online project management tool which is most popular in the market at the present. With Trello you can create multiple projects, assign tasks to your team members, and can track the progress of each step.

So, who should use Trello?


Whether you’re a student working on an academic project, a teacher who wants to plan semester course work , an employer who wants to assign tasks to his team, a blogger who wants to create a long-term blog plan, a traveler who to create bucket list, a book reading enthusiast who want to create a reading library or schedule, a creative agency or a big organization, or you just want to organize your daily routine tasks, then Trello is the best tool for you!

Here’s a step by step guide on how to get you rolling with Trello!

Add Project Name

First, go to Trello’s website where you can sign up for free, either creating a new account or using an existing Gmail account.

Once you’re done with one-click sign-up, add the project name you want to work on. Just like in the picture below let’s assume you want to work on Brand Management Project.

Create Lists

Next step is to create lists you want to work on. For example, in the picture below the lists are named as “Things To Do”, “Doing” and “Done” or you can create list names of your own choice.

Create Cards

Each further category of a list is called a card. For example, in our Brand Management project, we have added three lists. Let’s say we add three additional cards in the “Things To Do” list as our project deliverables named:

  • Brand Introduction
  • Marketing Strategy
  • Financial Planning

Create Boards

Once you’re done assigning project name, creating lists and cards, you will be then directed to your Trello board or simply your Trello workspace.

Trello Board is where all your work is placed, done, shared or in simple words where your project work is managed.

You can also create multiple project boards for your every project in Trello.

Create a Team

Creating a team is very simple. Just tap on the Trello logo on the top center of your board and you will be directed to another page. It will look like in the picture below.

On the left corner, tap on create a team and add participant’s name and click create.

Notifications

The notification function helps you keep on the track on what’s being done, by whom and when. Now you will never miss a thing.

Menu

The menu option shows your project activity, it also gives options to change board background, add card filters, stickers, Power-ups, and much more.

Trello Power-Ups

Power Ups in Trello are just like extensions are in Google Chrome. These are additional tools you can add to your Trello board to manage your projects more effectively.
You can add/drop the power-ups as you wish, depending on the Trello price package you’ve subscribed.

Create A Shareable Board Link

Just like many other online workspaces you can also create a shareable link with Trello. Using this link anyone can view your project board.

Go to the right corner, tap on menu and at the end of it you will see an automatically generated board link of your project.

Trello’s diversity and ease to use with interesting features show that it is almost for everyone- simply one tool for all. One can share his/her Trello board with public or can keep it privately. The online collaboration has made it easy to interact with team members even if you’re sitting at the other corner of the world.

How To Use Microsoft OneNote To Take Notes

By Leigh Burke on March 28, 2019

Just like the name suggests, Microsoft OneNote is a digital note-taking software. It helps you to create multiple notebooks at a single place.

Microsoft OneNote is often used by students to create academics notes but it can also be used by professional purposes such as organizing meetings, for travel journals, for shopping or to do lists and much more.

Below are a few tips on how to get started with Microsoft OneNote Like a Pro!

  1. Create a Notebook

The first step is to create a Notebook. Let’s assume you’re a Business Management student and you want to create a Notebook for one of your courses named Marketing.

  • Right Click Notebook on the ribbon
  • Then go to properties
  • Here you can add the title of your Notebook, specify color, document location, and file format
  • Create Sections

Just like a physical Notebook, Microsoft OneNote allows you to create multiple sections for each Notebook you create. For example, you created a Notebook for marketing course and now you want to add notes for each different chapter, you will add sections and rename them as chapter 1, chapter 2 and so on, Here’s how to add new sections:

  • Right next to Notebook title, there is a Plus sign, tap on it to add new sections
  • When you right click each section an additional window will opens which will give options for making changes in each section
  • Create Pages

            Microsoft OneNote allows you to add as many new pages as you want to each section you created.

  • On the right pane, there is an option to add new pages
  • You can also add title, date, time, etc. to each page either by simply clicking or right-clicking each page

There are also a bunch of amazing page templates such as professional, academic and other which you can use.

  • Simply go to Top Ribbon > Insert > Pages > Pages Templates
  • Add Tags
    One of our favorite feature of OneNote is adding specific tags. It is very easy to create a variety of tags for important points, be it a single word, line or paragraph and whether you want to discuss that important point later with the professor, employer, or you simply want to remember it.


  • Go to Top Ribbon > Home > Tags
  • Add documents. Pictures, Audio, or Video

You can also insert media into your OneNote pages such as images, files, recordings, link, etc.

  • Go to Top Ribbon > Insert > Your desired media preference
  • Convert Hand-written Text into Editable Text
    Another interesting feature of Microsoft OneNote is it allows you to hand draw text and also allows you to convert that hand-written text into editable one.


  • Go to Draw > Choose any Drawing tool > Draw text on your page
  • Then in the draw tab go to Lasso select and select the text you want to convert
  • Then go to and tap on Convert ink to Text
  • Share Your Notebook
    Just like other Microsoft office products like PowerPoint, Excel, Word you can also share your OneNote notes online with your friends, family, and coworkers.
  • Go to File > Share
  • Upload your Notes One Drive and create a link or simply add email of the recipient and click send

  • Data Recovery

Make sure to always store OneNote data on your One Drive. That way, if you happen to lose your data due to some undesirable or sudden situations such as if you happen to lose your mobile phone or laptop, or delete any page mistakenly, you can always retrieve or recover your lost data on Microsoft OneNote.

  • Go to File > Info
  • Then tap on Open Backups


The instructions discussed above are just a few features of Microsoft OneNote. We hope these tips help you in understanding the basic of Microsoft OneNote. Once you start using OneNote and explore you it a little, you will easily get to know other features within no time as well.

How to set up a self-hosted WordPress website

By Leigh Burke on March 26, 2019

Whether you are a small or big business, a freelancer, a programmer or just a simple blogger, owning a website means you can not only target a large number of the audience but you can also secure your brand credibility.

Back in the days, blogging was considered only as a nerd’s thing.  But all thanks to the technology, you do not need to be a programming ninja to launch and run your own website. Anyone can create their own website today.

So before we start let us clear out on what is self-hosting and WordPress.
WordPress is an online content management system. It was launched in 2003 and since then it has become an extremely popular blogging platform. The amazing thing about WordPress is that it is totally free of cost. On the contrary, a self-hosted website is one where you have the authority to control your own website.

Let’s start rolling! Here’s how you can set up your own site:

  1. Choose Domain Name and Hosting

First of all, choose a domain name. A domain name is something that appears in your website URL address for example teachsavvy.com. It makes your website appears more professional.
Web hosting is what makes your website go ‘live’ by providing your access to the World Wide Web.

There are many web hosting providers. We recommend you to choose Bluehost for their great service support and amazing features.


Here’s how to get a domain name and hosting account on Bluehost.

  • Go to Bluehost official website
  • Choose your domain name and click next
  • Select a plan
  • Create an account by adding an account, payment, package information and package extras and hit submit
  • After you’re done with your Bluehost sign up, you will be directed to your new Bluehost account.
  • In the top ribbon, tap on the account and generate a new password
  • Install WordPress Site
  • Now login to your Bluehost account using your domain name and password.
  • In the top ribbon tap on Hosting and then go to cPanel
  • Scroll down to the heading website builders and choose WordPress
  • You will be directed to a new page where you can install WordPress in one step by clicking on Start
  • Save your URL and password information separately in order to be on the safe side for future use.
  • Login and Get Ready to Blog

Now click on your website Login URL which will look like this ( www.teachsavvy/wp.admin )

  • Enter user info and Password
  • And Congratulations!  You just landed on your own new website
  • Your website will look like this from the front end
  • And this is how your website will look from the back-end.

Here you can change themes, add plugins, add blog posts, widgets and customize your site as you wish!

And that’s a wrap! We made each step as simple and understandable as possible and we hope these steps help you in launching your new site. And don’t forget to share your experience with us.

 Happy Blogging!

  • « Go to Previous Page
  • Page 1
  • Interim pages omitted …
  • Page 15
  • Page 16
  • Page 17
  • Page 18
  • Go to Next Page »

Primary Sidebar

SEARCH TRAINING GUIDES

FREE COPY OF TRAINING PROFITS MANIFESTO

Oh hi there 👋 It’s nice to meet you.

Fill in your first name and email address below and click ‘SEND ME MY COPY NOW’ to claim your free copy of the Training Manifesto.

We don’t spam! Read our privacy policy for more info.

Check your inbox or spam folder to confirm your subscription.

Categories

  • Training Profits Manifesto
  • Our Courses
  • Free Guides
  • Terms & Conditions
  • Privacy Policy
  • Contact Me
  • Socials

Cart

Copyright © 2025 · TrainingProfits.com · Log in