• Skip to primary navigation
  • Skip to main content
  • Skip to primary sidebar

Training Profits

Learn How To Create An Online Course

  • START HEREHow it works
    • How It Works
    • > HOME
  • COURSESLearning For Trainers
    • Training Profits Course
    • Filming Profits Course
    • > All Training Courses
  • PRODUCTSStuff To Help You Succeed
    • The Training Manifesto
    • Training Profits Book
    • Training Templates
    • Green Screen People
    • Sell Your Courses
    • > All Products
  • RESOURCESMy Recommendations
    • Linktree
    • Kit & Resources
      • My Training Kit
      • Training Tools
      • Training Resources
      • Training Profits Merch
      • Free Guides
      • Free Videos
      • Course Creators Newsletter
      • Course Creators Association – coming soon
      • Free Webinars – coming soon
You are here: Home / Archives for Create An Online Course

Create An Online Course

How To Use Trello To Manage Your Projects

By Leigh Burke on March 31, 2019

What’s Trello?

Trello is the coolest and an easy to use online project management tool which is most popular in the market at the present. With Trello you can create multiple projects, assign tasks to your team members, and can track the progress of each step.

So, who should use Trello?


Whether you’re a student working on an academic project, a teacher who wants to plan semester course work , an employer who wants to assign tasks to his team, a blogger who wants to create a long-term blog plan, a traveler who to create bucket list, a book reading enthusiast who want to create a reading library or schedule, a creative agency or a big organization, or you just want to organize your daily routine tasks, then Trello is the best tool for you!

Here’s a step by step guide on how to get you rolling with Trello!
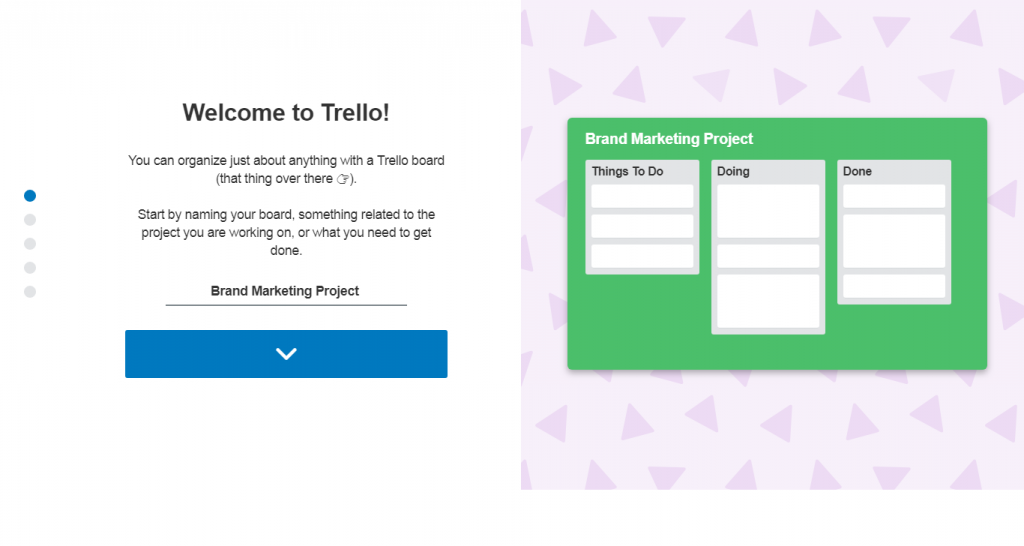
Add Project Name

First, go to Trello’s website where you can sign up for free, either creating a new account or using an existing Gmail account.

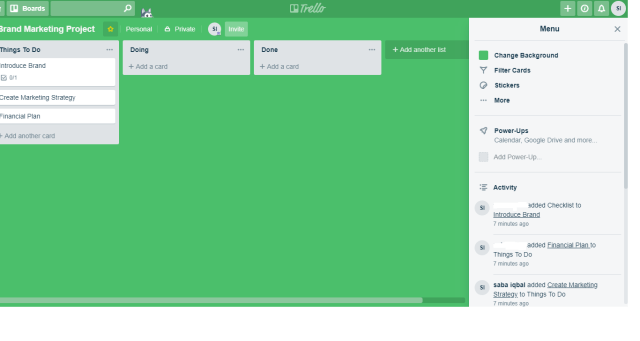
Once you’re done with one-click sign-up, add the project name you want to work on. Just like in the picture below let’s assume you want to work on Brand Management Project.

Create Lists

Next step is to create lists you want to work on. For example, in the picture below the lists are named as “Things To Do”, “Doing” and “Done” or you can create list names of your own choice.

Create Cards

Each further category of a list is called a card. For example, in our Brand Management project, we have added three lists. Let’s say we add three additional cards in the “Things To Do” list as our project deliverables named:

  • Brand Introduction
  • Marketing Strategy
  • Financial Planning

Create Boards

Once you’re done assigning project name, creating lists and cards, you will be then directed to your Trello board or simply your Trello workspace.

Trello Board is where all your work is placed, done, shared or in simple words where your project work is managed.

You can also create multiple project boards for your every project in Trello.

Create a Team

Creating a team is very simple. Just tap on the Trello logo on the top center of your board and you will be directed to another page. It will look like in the picture below.

On the left corner, tap on create a team and add participant’s name and click create.

Notifications

The notification function helps you keep on the track on what’s being done, by whom and when. Now you will never miss a thing.

Menu

The menu option shows your project activity, it also gives options to change board background, add card filters, stickers, Power-ups, and much more.

Trello Power-Ups

Power Ups in Trello are just like extensions are in Google Chrome. These are additional tools you can add to your Trello board to manage your projects more effectively.
You can add/drop the power-ups as you wish, depending on the Trello price package you’ve subscribed.

Create A Shareable Board Link

Just like many other online workspaces you can also create a shareable link with Trello. Using this link anyone can view your project board.

Go to the right corner, tap on menu and at the end of it you will see an automatically generated board link of your project.

Trello’s diversity and ease to use with interesting features show that it is almost for everyone- simply one tool for all. One can share his/her Trello board with public or can keep it privately. The online collaboration has made it easy to interact with team members even if you’re sitting at the other corner of the world.

How To Use Microsoft OneNote To Take Notes

By Leigh Burke on March 28, 2019

Just like the name suggests, Microsoft OneNote is a digital note-taking software. It helps you to create multiple notebooks at a single place.

Microsoft OneNote is often used by students to create academics notes but it can also be used by professional purposes such as organizing meetings, for travel journals, for shopping or to do lists and much more.

Below are a few tips on how to get started with Microsoft OneNote Like a Pro!

  1. Create a Notebook

The first step is to create a Notebook. Let’s assume you’re a Business Management student and you want to create a Notebook for one of your courses named Marketing.

  • Right Click Notebook on the ribbon
  • Then go to properties
  • Here you can add the title of your Notebook, specify color, document location, and file format
  • Create Sections

Just like a physical Notebook, Microsoft OneNote allows you to create multiple sections for each Notebook you create. For example, you created a Notebook for marketing course and now you want to add notes for each different chapter, you will add sections and rename them as chapter 1, chapter 2 and so on, Here’s how to add new sections:

  • Right next to Notebook title, there is a Plus sign, tap on it to add new sections
  • When you right click each section an additional window will opens which will give options for making changes in each section
  • Create Pages

            Microsoft OneNote allows you to add as many new pages as you want to each section you created.

  • On the right pane, there is an option to add new pages
  • You can also add title, date, time, etc. to each page either by simply clicking or right-clicking each page

There are also a bunch of amazing page templates such as professional, academic and other which you can use.

  • Simply go to Top Ribbon > Insert > Pages > Pages Templates
  • Add Tags
    One of our favorite feature of OneNote is adding specific tags. It is very easy to create a variety of tags for important points, be it a single word, line or paragraph and whether you want to discuss that important point later with the professor, employer, or you simply want to remember it.


  • Go to Top Ribbon > Home > Tags
  • Add documents. Pictures, Audio, or Video

You can also insert media into your OneNote pages such as images, files, recordings, link, etc.

  • Go to Top Ribbon > Insert > Your desired media preference
  • Convert Hand-written Text into Editable Text
    Another interesting feature of Microsoft OneNote is it allows you to hand draw text and also allows you to convert that hand-written text into editable one.


  • Go to Draw > Choose any Drawing tool > Draw text on your page
  • Then in the draw tab go to Lasso select and select the text you want to convert
  • Then go to and tap on Convert ink to Text
  • Share Your Notebook
    Just like other Microsoft office products like PowerPoint, Excel, Word you can also share your OneNote notes online with your friends, family, and coworkers.
  • Go to File > Share
  • Upload your Notes One Drive and create a link or simply add email of the recipient and click send

  • Data Recovery

Make sure to always store OneNote data on your One Drive. That way, if you happen to lose your data due to some undesirable or sudden situations such as if you happen to lose your mobile phone or laptop, or delete any page mistakenly, you can always retrieve or recover your lost data on Microsoft OneNote.

  • Go to File > Info
  • Then tap on Open Backups


The instructions discussed above are just a few features of Microsoft OneNote. We hope these tips help you in understanding the basic of Microsoft OneNote. Once you start using OneNote and explore you it a little, you will easily get to know other features within no time as well.

How to set up a self-hosted WordPress website

By Leigh Burke on March 26, 2019

Whether you are a small or big business, a freelancer, a programmer or just a simple blogger, owning a website means you can not only target a large number of the audience but you can also secure your brand credibility.

Back in the days, blogging was considered only as a nerd’s thing.  But all thanks to the technology, you do not need to be a programming ninja to launch and run your own website. Anyone can create their own website today.

So before we start let us clear out on what is self-hosting and WordPress.
WordPress is an online content management system. It was launched in 2003 and since then it has become an extremely popular blogging platform. The amazing thing about WordPress is that it is totally free of cost. On the contrary, a self-hosted website is one where you have the authority to control your own website.

Let’s start rolling! Here’s how you can set up your own site:

  1. Choose Domain Name and Hosting

First of all, choose a domain name. A domain name is something that appears in your website URL address for example teachsavvy.com. It makes your website appears more professional.
Web hosting is what makes your website go ‘live’ by providing your access to the World Wide Web.

There are many web hosting providers. We recommend you to choose Bluehost for their great service support and amazing features.


Here’s how to get a domain name and hosting account on Bluehost.

  • Go to Bluehost official website
  • Choose your domain name and click next
  • Select a plan
  • Create an account by adding an account, payment, package information and package extras and hit submit
  • After you’re done with your Bluehost sign up, you will be directed to your new Bluehost account.
  • In the top ribbon, tap on the account and generate a new password
  • Install WordPress Site
  • Now login to your Bluehost account using your domain name and password.
  • In the top ribbon tap on Hosting and then go to cPanel
  • Scroll down to the heading website builders and choose WordPress
  • You will be directed to a new page where you can install WordPress in one step by clicking on Start
  • Save your URL and password information separately in order to be on the safe side for future use.
  • Login and Get Ready to Blog

Now click on your website Login URL which will look like this ( www.teachsavvy/wp.admin )

  • Enter user info and Password
  • And Congratulations!  You just landed on your own new website
  • Your website will look like this from the front end
  • And this is how your website will look from the back-end.

Here you can change themes, add plugins, add blog posts, widgets and customize your site as you wish!

And that’s a wrap! We made each step as simple and understandable as possible and we hope these steps help you in launching your new site. And don’t forget to share your experience with us.

 Happy Blogging!

How To Brand Your Business For Success

By Leigh Burke on March 13, 2019

Having professional branding for your business is essential to projecting a positive, reliable image to you potential clients. Think about it, would you do business with a company that has a bad logo or website? If you look at the social accounts of a company does it give you more confidence if there is a consistent theme, colours and logo across all the accounts and their website?

The Logo

Creating a logo doesn’t need to be a massively expensive venture. There are plenty of options for creating one yourself, or you can hire a designer from a website like Fiverr.com to come up with some options for you. You want to make sure you have a high resolution version of your logo, and that it is a PNG file with a transparent background. If you have a tagline, it also pays to have several layout options, e.g. logo at bottom, logo at the side etc. as shown below.

Video

Video is an important element to engage your audience. To brand your videos and male them more professional, you should always include a short intro or outro (scene at the end of your video). This can be as simple as an animation of your logo with a short music jingle. Keep it short. Nobody wants to sit there for 5-10 seconds watching your intro. If you do have a longer logo animation, perhaps include it at the end as an outro. You can create these animations yourself with various software packages available online, or simply search “video intro” on Fiverr.com to find a virtual assistant to help you create your intro. Below are some sample intros created for Training Profits.

Ebooks, Reports & Courses

If you are producing eBooks, Reports or Courses, it is important to also brand these and create digital collateral that will help your audience associate the resources with your brand and also to raise the perceived value of the product or resource. People want to be able to visualise what it is they are downloading or purchasing. What is included? If it’s a course, are there worksheets, workbooks, videos, audio files? This can all be represented in a graphic. You can get your designer on Fiverr.com to create these graphics or search online for “ebook cover creator” and create these yourself. Below are some examples of what we created for our “Training Manifesto”. The original cover was created in Canva.com and then the flat file was turned into the various 3d graphics.

Social accounts

Most people know about Instagram, Twitter, Facebook and Youtube. There are also other social networking sites like LinkedIn, as well as publishing sites like Medium, Reditt etc.

If you haven’t already registered for these services, I recommend you do so (even if you are not planning on using them straight away). A great way to check if your name is available on a particular service is to use a website like namechk.com. It will check your name availability across all the major social network sites and a plethora of other services. Register as many as you need, but make sure you register for the major ones mentioned above. In addition, on Facebook, register your name for a Facebook page and a Facebook group.

Once you have registered for all these services, log into each one individually so you can set up your branding. Your branding will include things like your profile photo, header banners etc. Each service has different requirements for size etc. so check what they are before you upload your graphics. On Canva.com, they have templates for things like Youtube cover art, facebook banners etc. Use these templates ot make sure you get the right size.

Click our social icons on the right (they’ll open in new browser tabs) to have a look at our current branding for each of the services.

Conclusion

As you can see , utilising Logos, Videos and Graphics within your business helps you portray that professional touch. Your audience is more likely to engage with you if you have consistent branding across your website and social accounts. If you haven’t already done so, jump on Fiverr.com and hire a designer to help you create some of the logos and graphics you may require. It’s relatively inexpensive, and you can start being more professional today.

6 critical success factors for your next IT Systems Training Program

By Leigh Burke on March 5, 2019

Training in an organisational context can take genesis from a number of different origins.  Often there is an organisational drive to improve workplace practices, maintain current skills levels or some external driver such as government accreditation.  These programs can be driven by the business or a dedicated Learning and Development business unit, often under the umbrella of Human Resources.

Another key driver for training and re-skilling is the introduction of new Information technology systems.  As more and more systems move to enterprise level solutions, every area of a large organisation is touched by this technology.  Often combining offline business processes and procedures with explicit steps required within the IT system, these solutions can be difficult for some employees to learn especially for those segments of the workforce with a lower level of IT literacy.

Where does Training fit in?

So how does Training fit into the overall Program of work?  I’m going to focus on enterprise level IT system projects.  Many organisations employ a project management methodology such as PRINCE2, or Agile.  These are just different approaches to managing and implementing the project.  Often there will be a dedicated project team consisting of a Project Manager, Project Coordinator, Subject Matter Experts (SMEs), Technical Experts, Business Representatives, Testers & Trainers.  Some of the resources may be dedicated, some may be part-time and working on several projects along with business as usual (BAU) activities – that is their day to day duties.

The structure of the project will include standardised documentation such as the business case, a project plan, a project schedule, work breakdown structure, along with other artifacts such as meeting agendas, minutes, status reports etc. that are produced as the project progresses and used to track deliverables and provide accountability.  The project team will normally meet at least once weekly, supplemented by other meetings and workshops as required.  The project manager will report to the sponsor and/or project board for guidance and sign off on critical strategic decisions.  The trainer will align their schedule and deliverables with the overall project plan and schedule.

1.  Engage your Trainer Early in the project life-cycle

The trainer is normally engaged early in the project to ensure they are available to attend key meetings and workshops and to give them time to learn the business processes, system and solution.  This however is not always the case, and often the trainer will be engaged at a later date in the project often to save money.  Training can be seen as an after thought where the end users of the system are just shown how to access the system and given their log on and then left to their own devices.  

A good project manager will engage the trainer early on in the process to ensure a deep level of engagement.  The trainer will need time to conduct impact assessments and training needs analysis (TNA).  This process starts early on to ensure enough time to reach all the key stakeholders and impacted areas of the business.  This is especially important for geographically dispersed workforces, as engagement with every area of the business will not only ensure inclusiveness but provide for a much wider level of adoption and take up when the system goes live.  Make sure you also have contingency should you experience project delays or require post go-live support.

2.  Insist on an Impact Assessments and a Training Needs Analysis

The training needs analysis highlights key areas of focus for the strategic approach of training as well as learning needs of the many varied audiences.  These are also a way to help start to build a champions network across the organisation.  Champions are the people within the organisation that you can call on to become key users of the system and help embed the change across the organisation.  Special needs of the training audience will also be identified in these sessions e.g. ESL, ageing workforce, shift workers.  The TNA can also shed  light on logistical considerations like rooms and resources for training, access to facilities etc.  The impact workshops themselves are generally a facilitated discussion where the attendees are guided through a series of questions about the proposed system and change that are designed to illicit discussion amongst the group and highlight any risks, issues and areas of resistance to the proposed change.  These can then be documented and a mitigation strategy put in place to minimise them.    

3.  Get Business agreement on your Training Strategy and Plan

The trainer next needs to put together a strategy and plan for the training.  The strategy is higher level.  What is the training approach?  Will we be delivering face to face training, remote online training via technology such as Webex, eLearning?  Will we be using a train the trainer approach where we identify and train key users across the business who can then go and train other staff at their site?  Do we need to assess staff as part of the learning process?  Once some of these key decisions are made and socialised with the business, the trainer can begin to work on the training plan.  The training plan will start to solidify what is happening and when.  There will be a process to design, develop and deliver the training content according to the training strategy.

4.  Schedule Subject Matter Experts to help the Trainer develop content

Training content development is normally done in conjunction between the trainer and the SMEs.  The SMEs will provide the expert guidance and knowledge and the trainer will document and turn this information into relevant training modules in accordance with the training strategy and plan.  SMEs can be technically or business focused, and often there will be a mix of both on a project to get a full end to end understanding of the technology and process changes that are being implemented within the business.  The training artifacts are produced and then go through a review and sign off process.  These training materials will include training manuals, quick reference guides, trainer notes, training slide decks, scripts, activities, session plans, online help and eLearning.

5.  Provide the trainer with a fully configured system early on

An important dependency for the IT system trainer to complete their work is to have a fully configured system they can access to be able to step through each part of the program that they will be teaching.  This is important from both a learning perspective for the trainer, but also for them to be able to document the steps involved and take screenshots and videos for the training materials.  Some vendors provide out of the box training materials, often these will be generic in nature and not take into consideration any configurations, customisations, branding or business processes.  The trainer normally gets access to this system during the User Acceptance Testing (UAT) phase, or just prior.  Often this compresses the time available for training materials development.  Remember to allow time for the review and approval process as well as printing of any physical materials.  For eLearning, you’ll need to liaise with the Learning Management System (LMS) Administrator to upload and host the modules.

6.  Leverage your Champion Network to facilitate training logistics, delivery and drive success

Once all the training materials have been developed for all the modules and courses, materials need to be printed, workbooks produced, rooms booked and invites sent out to participants for each session.  This is a big logistical job that the project administrator can often help with, or the champions or admin staff from each site.  If training is being conducted off-site, external training facilities will need to be booked.  For all day courses, lunch can often be supplied for participants, along with things like snacks, mints, lollies, biscuits and water.  Your champions have the local knowledge to pull this all together and help make the training sessions a resounding success.

When all is said and done, a talented trainer should deliver a successful training program.  Of course the definition of “success” is subjective, so you’ll want to make sure you define that early on.  Even with pockets of resistance across the business, with a dedicated team and trainer, success can be achieved.  Of course having quantitative data is always more preferable, so make sure you have attendance lists for all training courses, feedback forms for all participants at the end of the course (or an online survey tool).  If assessments are involved, make sure these are all tracked, recorded and reported as part of your project success.  Finally, don’t forget to include your trainer in the post implementation review.  Lessons learned are always good, but only if those lessons are taken and applied to your next project.

4 Tips for a Successful Training Development

By Leigh Burke on March 5, 2019

Successful training programs require the development of many different training artefacts and collateral.  These include things such as training manuals, quick reference guides, slide decks, user guides, participant guides, training activities, lesson plans, training plans, eLearning modules and more.  These materials are developed in association with the training professional and subject matter experts from the business.

1.  Before any materials are developed though, the course curriculum, modules, structure, modes of delivery and content need to be mapped out in a training strategy, approach and plan then reviewed and signed off by the project sponsor, SMEs, key stakeholders and project team.  It is critical to get the plan in place as early as possible and get agreement to all of the above to ensure the business is fully engaged and supportive of the plan for development of the materials for the learning program.

2.  Quality materials should be aesthetically pleasing to the eye.  The visual layout should be such that they are easy to read and digest, follow a logical sequence and highlight the key components of information required by the learner to meet the learning objectives.  Templates and materials should follow visual and instructional design principles to ensure the quality of the items created is maintained to the highest standard.

3.  To achieve a consistent look and feel across the suite of materials developed for the learning program, templates for common programs such as Word and PowerPoint should be used.  The templates developed should adhere to the style guides and visual communications standards of the organisation they are being developed for.  These are often available from internal communications or marketing teams and HR.  Once developed, the templates need to be distributed to all the staff developing training materials for the program so that a consistent look and feel is maintained.

4.  The review and approval process can be difficult and confusing if the process is not agreed and communicated up front to the entire project team.  The best way to manage the review, update and approval of documents is to use a document management system such as SharePoint if available.  This will allow individual team members to check documents out and lock them while they are updating or reviewing them.  Be sure to get reviewers to turn track changes on on documents when they are reviewing.  This will allow you to quickly track and accept updates.  Alternatively, provide hard copies or PDF to reviewers, but always have an agreed review-by date for return of feedback.

Engagement with your project team, sponsor and key stakeholders is key for the successful development of your training materials.  Agreeing content and process for review and approval up front will remove room for misunderstanding and reduce any likelihood of miscommunication amongst the team.  Use templates and follow visual design guidelines to ensure a consistent look and feel for all materials developed as part of the learning program.

  • « Go to Previous Page
  • Page 1
  • Interim pages omitted …
  • Page 11
  • Page 12
  • Page 13

Primary Sidebar

SEARCH TRAINING GUIDES

FREE COPY OF TRAINING PROFITS MANIFESTO

Oh hi there 👋 It’s nice to meet you.

Fill in your first name and email address below and click ‘SEND ME MY COPY NOW’ to claim your free copy of the Training Manifesto.

We don’t spam! Read our privacy policy for more info.

Check your inbox or spam folder to confirm your subscription.

Categories

  • Training Profits Manifesto
  • Our Courses
  • Free Guides
  • Terms & Conditions
  • Privacy Policy
  • Contact Me
  • Socials

Cart

Copyright © 2025 · TrainingProfits.com · Log in