• Skip to primary navigation
  • Skip to main content
  • Skip to primary sidebar

Training Profits

Learn How To Create An Online Course

  • START HEREHow it works
    • How It Works
    • > HOME
  • COURSESLearning For Trainers
    • Training Profits Course
    • Filming Profits Course
    • > All Training Courses
  • PRODUCTSStuff To Help You Succeed
    • The Training Manifesto
    • Training Profits Book
    • Training Templates
    • Green Screen People
    • Sell Your Courses
    • > All Products
  • RESOURCESMy Recommendations
    • Linktree
    • Kit & Resources
      • My Training Kit
      • Training Tools
      • Training Resources
      • Training Profits Merch
      • Free Guides
      • Free Videos
      • Course Creators Newsletter
      • Course Creators Association – coming soon
      • Free Webinars – coming soon
You are here: Home / Archives for elearning

elearning

How to Create a Course with Adobe Captivate

By Leigh Burke on May 1, 2019

Are you thinking of running your first eLearning course but you do not have enough budget to get help from experts?

So, you have decided to create the course yourself but you don’t know where, how, and which software to start with. Don’t worry, consider your problem solved because we have got all the basic information on how you can kick start your journey on the creation of eLearning courses.

Why Adobe Captivate?

Adobe Captivate makes your course responsiveness very fast. Additionally, it is simple to use and has all the basic features of your course creation.

Okay now, let’s get you on a roll with basic features you need to create your first course:

Create a Project

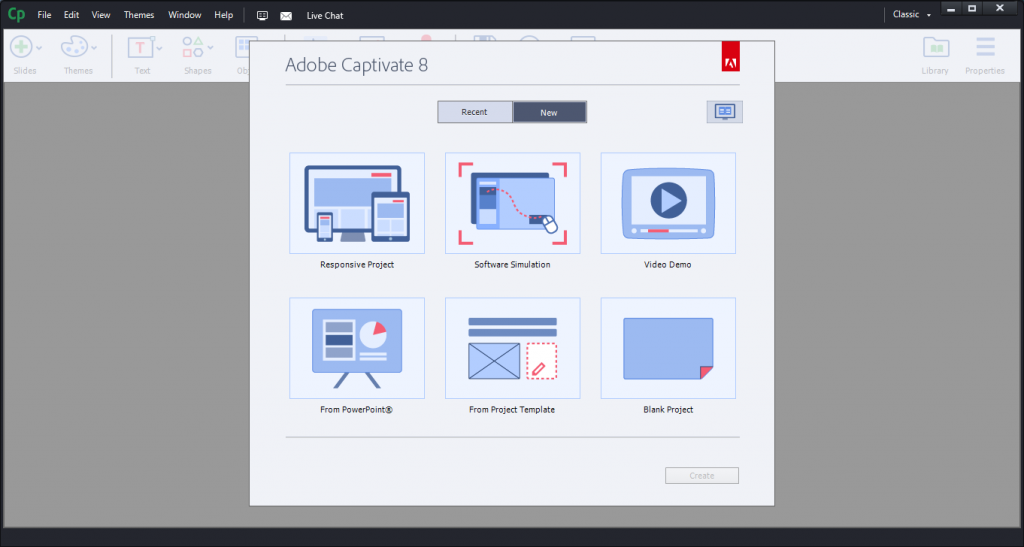
When you run the Adobe Captivate, the start screen will give a few options to choose from to create your project on, such as:

  • Responsive Project: Creating projects using this option means the projects will automatically be responsive on different devices such as desktop, tablet, and mobile device
  • Software Simulation: Using this option you can record screen and record  audio at the same time
  • Video Demo: You can create video demonstrations for various learning purposes using this option
  • From PowerPoint: If you have existing course content in the form of PowerPoint slides then you do not have the need to recreate them again. Open and upload PowerPoint from your desktop and start working.
  • From Project Template: If you want to use a pre-made or specific template for your project then you can use this option
  • Blank Project: If you want to create a project from scratch and customize it according to your own liking, then you can use this option
  • After you’re done selecting the project type, choose screen/canvas size andpress create

Add Theme

Now as you enter the Adobe Captivate interface. You will have a range of features to work with and this is what your workspace will look like:

First thing, let’s choose a theme:

  • Go to the top ribbon>theme>ok
  • You can also download themes from Adobe Captivate online resources. There are many templates, themes, characters for various categories.

Add Slides

To add new/more slides:

  • Go to the Top Ribbon>Slides
  • Press drop-down bottom to choose the type of slide want to add
  • Select a slide, go to properties on the right pane and customize it such as background, slide type, slide duration, etc.
  • You can also add new slides by simply by right tapping the existing slide on the left pane

Add Text

To add text:

  • Go to the top ribbon>text
  • Select one option from  either a text box or caption
  • You can change font style, size, color, etc. by going to properties in the right pane

Add characters

Apart from shapes and other interactive objects, Adobe Captivate allows you to insert various characters. To do that:

  • Go to top ribbon>media>add characters
  • Choose character category such as business, casual, medicine, etc.
  • Pick a character and download it from captivate eLearning Art
  • Add downloaded character from your Pc, adjust character position and hit ok.

Add interactions

Interaction button is used for various purpose, you add an interaction button in a quiz to move to the next slide or page or a submit button.

  • Go to the top ribbon>Interactions>interaction type>ok

Add Audio/Video/Images

To add digital media:

  • Go to the top ribbon>media
  • Select the media option and upload from pc
  • In case of audio and video files, you can also create a link and add it to the slides

Record Screen

To record screen:

  • Go to the top ribbon>record
  • A new window will open
  • Press start recording
  • You can also record audio at the same time you record your screen

Add Quiz

To add quiz question slides:

  • Go to the top ribbon>Quiz
  • Select quiz slide type
  • Or
  • Import existing quiz template
  • Choose from question types such as mcqs, polls, short answers, etc.
  • Add questions and press ok

Add Table of Contents

To add a table of contents do the following steps:

  • Go to Themes>Table of contents
  • Or press SHIFT+F10
  • A new window opens
  • Press Show TOC to show slides
  • For additional customization go to setting on bottom left side

Save, Preview, and Publish

Once you’re sure that you have completed the project, preview your course and publish it.

  • To preview the course go to the top ribbon>preview
  • Press Publish which is right next to preview option
  • Add project tile, browse category, select format and press ok

EndNote

This seems like a piece of very basic information but to start as a newbie this information will serve you more than just a basic purpose. If you’re still not sure whether you should try adobe captivate, we recommend you to first try the trial version of this software before you actually purchase it.
With that being said, Cheers and Happy Authoring eLearning courses!
How To Publish Your Course On Udemy

By Leigh Burke on April 27, 2019

Have you ever imagined sharing your knowledge about something you’re passionate about and earning a huge monetary reward from it? That’s what Udemy’s instructors are doing. According to many reports, it is stated that the average amount earned by per instructor is $50,000-$100,000.

To do that, you have to create at least 30 plus minute long videos and upload them in the form of a course. The good news is that there are no heavy prerequisites to be an instructor on Udemy. All you have to do is publish your course, sit back and relax, leave the advertising to Udemy and watch your sales go up and up!

But before you decide to teach on Udemy, let us walk you through the step by step guide on how to publish your first course on Udemy in just one day.

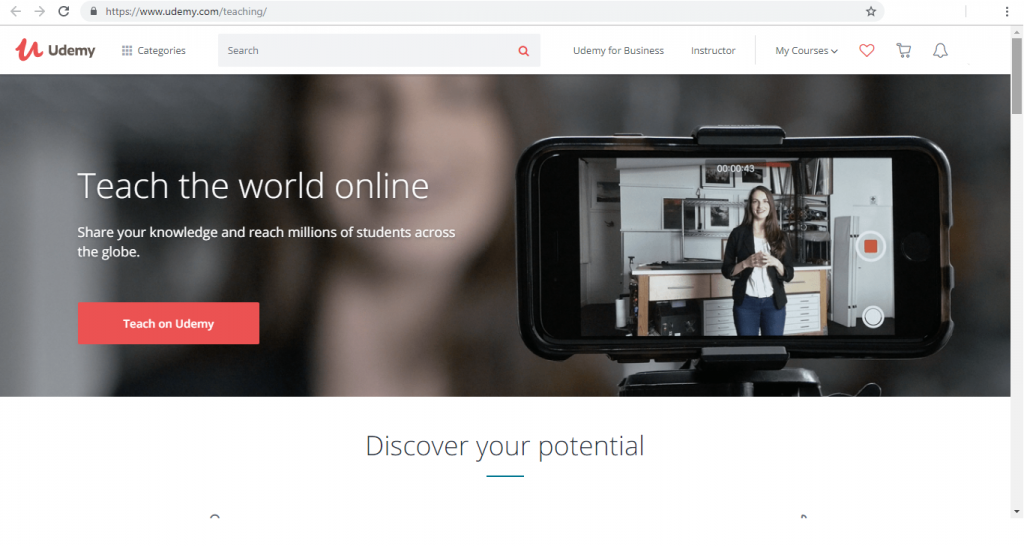
First of all go to Udemy.teach official site, sign up and get started.

Plan Your Course

1) Target Your Students

This section is sort of like FAQs page. Here you answer the following questions:

  • What is the course about and what skills students will acquire after learning this course?
  • Who is the\is course for? For example is it for beginners, intermediate or pro learners?
  • What additional resources students need to learn this course? For example, if the course is about photography then having access to Adobe Photoshop is a must

2) Course Structure
Create a structured course outline. Divide the course into different sections such as:

Lectures Section

  • Introduction
  • Main Body
  • End

Quiz Section

Resource or learning material Section

3) Setup and Test Video

Before you officially start recording our video content make sure:

  • Your camera quality is good
  • There is no background music or noise that might disturb your students
  • Record in a place that can be used as a studio
  • You’re not hesitant to speak in front of the camera
  • Once all the instruments are ready, record the video and test it

Create Your Content

1) Film and Edit

After successfully planning everything related to course, it is now time to actually move to the next step and implement all planning strategies and start creating the content.

  • Record audio and video
  • Create notes
  • Edit videos to perfection using video editing software(s)

2) Curriculum

Now after the hard work of planning and creating content, it is actually time to upload everything and make use of it. 

  • Upload each lecture individually with name or title
  • Upload practice exercises
  • Upload quizzes

Please note that you can either upload the whole course content at once using bulk uploader option on the top right corner or you can upload the videos on a daily basis at your own pace. 

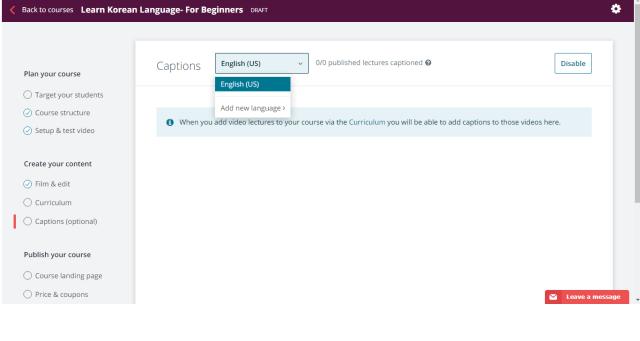
3) Add Captions

Captions or subtitles play a vital role. That is, suppose that your course is in English but a non-native English speaker can also take your course by turning on captions in his/her own language. Or if he can’t catch up with native English speaker he can open captions and understand more easily. 
Also, captions are a great source of learning for hearing impaired students.

Publish Your Course

1) Course Landing Page

This is the most important step. The sales you drive totally depends on the content and how much appealing your landing page is. Consider landing page as stage and where you present your sales pitch. Be careful and make sure you sound professional. This step requires the following details:

  • Add course title
  • Add course subtitle
  • Add compelling and concise course description
  • Add course language, category, and subcategory
  • Add your course image
  • Add a Promotional Video

2) Price and Coupon
In this step, you have to set up the price for your course.
You can choose the currency and price tier by hitting the drop down button.
You can also create course coupons from here

3) Course Messages
Course opening and closing messages are optional. But if you want to appear more professional and active then do add appropriate course messages.
The course messages are like proper etiquette that not only add warmth in your audience’s hearts but also make them feel important.

After you’re done with all the above steps, press submit for review button and wait until Udemy approves your course. Once your course is approved, it will be automatically published.

Bottom Line

Creating and publishing your first course may or may not always be a hit. So, make sure you choose your course title and content that is most in demand. Moreover, to increase sales either do upload your first course for free and add new courses and price them or provide limited time free access to your learners and once you have achieved a great number of reviews and audience add more content to your existing course lectures and now you can change access from free to paid.

How To Create A Course In Articulate Storyline 3

By Leigh Burke on April 10, 2019

Now you can create and design your own e-learning courses using Articulate Storyline 3. Articulate Storyline was initially launched in 2001 and since then it has almost 19 years of excellence. It is mainly a simple but powerful tool which is jam-packed with most intriguing, time and money saving features, taking the course designing process for eLearning platforms to a whole new level.

Additionally, you will find Articulate Storyline very familiar because it has a similar interface structure as that of Microsoft PowerPoint, giving you the feeling of old but familiar software with a touch of extra functions.

Let’s have a look at the short guide on how can you use some basic features of Articulate Storyline 3 and learn the functions of each mentioned feature.

Create a New Project

After completing the installation process of Articulate Storyline 3, open the application and hit New Project to get started.

Moreover, you can also import media/slides from your desktop or can restart an existing project.

Also, make sure to save your project file in your hard drive for future or re-use.

Storyview

Storyview contains all slides and scenes you create in your course. It appears as a map-like structure and here you can create triggers or link different scenes with each other.

Scenes

Just like a story is a compilation of different scenes, similarly, in Articulate Storyline, you can create scenes on each different slide.

In order to add scenes:

  • Go to storyview and press add new scenes in the  top ribbon
  • When you open a slide, on the left side there appears a scenes pane and you can manage and add new scenes from there as well

Characters

In order to keep your audience’s interest, you need to create engaging content and adding characters not only adds creativity to your content but it can also help your audience to understand and remember points more easily. With Articulate Storyline 3 you can add both photographic and cartoonish characters. You can also change the character’s expression such as happy or shocked and you can change the character’s pose as well, for example, hands at sides or hands crossed.

To add a character:

  • Go to the top ribbon>Insert
  • Press add character
  • A new window will open and from there you can choose your desired character

Timeline

The timeline appears at the bottom of your Articulate Storyline workspace or just below your slide. The timeline contains the order of things you add on each slide. For example, if you add a text box and a character and you want the character to appear first and text later then you can change their position/order in the slide by simply going to the timeline and dragging the character and text up or down.

States

In the states button which is right next to the timeline, you can change the state of text, character or anything else. Yes, you can change/edit states all you want.

For example, let’s say your character can’t solve a math’s problem and normally your character will show a sad/confused face. Then your character solves the problem is now it is happy.

You can set the normal state of character as confused/sad and initial state as happy by using states function.

Player Triggers        

Triggers are link buttons. You can directly jump from one slide or scene to another whether it is backward or forward. Player Triggers are present on the right side of your Articulate Storyline 3 workspace. You can choose a trigger of your choice from the drop-down list and add it.

Slide Layers

Slides layer is another important feature. Just like in Photoshop you can create different layers similarly in Articulate Storyline 3 you can also create multiple layers on each slide. Choose whether you want to show the slide layer or not or how and when the slide layer or objects in the slide should appear.

Slide layers pane appears on the right side and just right below the player triggers. To add new layers you can go the top ribbon>insert>slide layer.

Add Audio/Video/Web Object

You can add existing audio from your desktop or record on the spot using Articulate Storyline 3. Similarly, you can also add an existing video clip or record one by connecting your webcam with the articulate storyline. Now you can create slides and record audio/video at the same time and save your time.

You can also create an embedded video link/code and place it in the slide.

Add Quiz/Survey/Freeform

A course without a quiz is somewhat incomplete. You can easily create quizzes to engage your e-learning audience and test their learning capability by using Articulate Storyline 3. There various quiz templates which you can use according to your liking.

To add a new quiz in a slide:

  • Go to the top ribbon>slides
  • Press Graded quiz, choose a template, add quiz questions, and hit ok

Finish, Save, Preview and/or Publish

  • Once you’re sure you have added all the details finish it, and save it by going to the top ribbon>file>save
  • Before you publish your course you can also preview it in different device formats such as the computer, mobile, tablet, etc to make sure it works fine with all device formats. To preview your course go to the top ribbon>slides>preview
  • After you’re done with your preview test, wrap your course up and finally you can publish it by going to the top ribbon>slides>publish

Articulate Storyline 3 is easy and fun to create courses with. You don’t need to be a genius to create your first project. A little focus and simple drag/drop will certainly teach you more than a lot. So, grab your Articulate Storyline 3 full or trial version, start designing your first project and don’t forget to share your experience.

Primary Sidebar

SEARCH TRAINING GUIDES

FREE COPY OF TRAINING PROFITS MANIFESTO

Oh hi there 👋 It’s nice to meet you.

Fill in your first name and email address below and click ‘SEND ME MY COPY NOW’ to claim your free copy of the Training Manifesto.

We don’t spam! Read our privacy policy for more info.

Check your inbox or spam folder to confirm your subscription.

Categories

  • Training Profits Manifesto
  • Our Courses
  • Free Guides
  • Terms & Conditions
  • Privacy Policy
  • Contact Me
  • Socials

Cart

Copyright © 2025 · TrainingProfits.com · Log in