• Skip to primary navigation
  • Skip to main content
  • Skip to primary sidebar

Training Profits

Learn How To Create An Online Course

  • START HEREHow it works
    • How It Works
    • > HOME
  • COURSESLearning For Trainers
    • Training Profits Course
    • Filming Profits Course
    • > All Training Courses
  • PRODUCTSStuff To Help You Succeed
    • The Training Manifesto
    • Training Profits Book
    • Training Templates
    • Green Screen People
    • Sell Your Courses
    • > All Products
  • RESOURCESMy Recommendations
    • Linktree
    • Kit & Resources
      • My Training Kit
      • Training Tools
      • Training Resources
      • Training Profits Merch
      • Free Guides
      • Free Videos
      • Course Creators Newsletter
      • Course Creators Association – coming soon
      • Free Webinars – coming soon
You are here: Home / Archives for Training Guide

Training Guide

How To Start Your Own Podcast

By Leigh Burke on April 22, 2019

It always feels great to find better ways of income and we all know that podcast is one of them. While the podcast craze is still high, many have now started adopting it as a profession. But with that said, creating a professional-sounding podcast isn’t as simple as it sounds.

Here are some ways to actually create, record, and publish your first podcast—and get it infront of people.

First and foremost…

Things You Will Need:

  • Microphone

Getting a high quality mic should be your first priority. No one listens to a low quality sound and viewers who are eagerly listening to a podcast will tell the difference in an instance. So, your first priority should be to get a decent quality microphone. A decent choice is Audio-Technica AT2020s available for around $70 on Amazon. Most gamers use this mic with for their twitch session and they are earning pretty handsomely. So, it will work for you as well.

  • Editing Software

Next, arm yourself with a decent audio editing software. There are many on the market but it is always better to familiarize yourself with a good editing tool of your choice. You can get Audition CC by Adobe for $20 or Audacity for free.

  • Desktop PC/Laptop PC

A decent Desktop/Laptop that can edit your audio is also a good buy unless you already have a high performance PC. Audio and video editing software are heavy and they require a decent PC of at least…

  • 8GB RAM
  • Core i5 processor
  • 1TB Hard drive

A PC with these requirements is necessary for a decent edit of the podcast. You can add other things later to your podcast. Price of a PC will be around $500. You can also buy one on Amazon or Newegg.

Find a Niche

There is a saying, all the content that you want to talk about has already been talked about. So, how can you add your take to it? Respin it as per your need. That’s what every newscaster, producer, program anchor does. In fact, if you have been through a few YouTube videos, you will know that most of them are talking about the same thing, but just adding their own flare to it.

So, you just have to find a niche that you are passionate about and start podcasting.

Smart Passive Income blog owner, Pat Flynn, has been making over $2 million just by podcasting about how to make money PASSIVELY!

Here is a proof of his earnings.

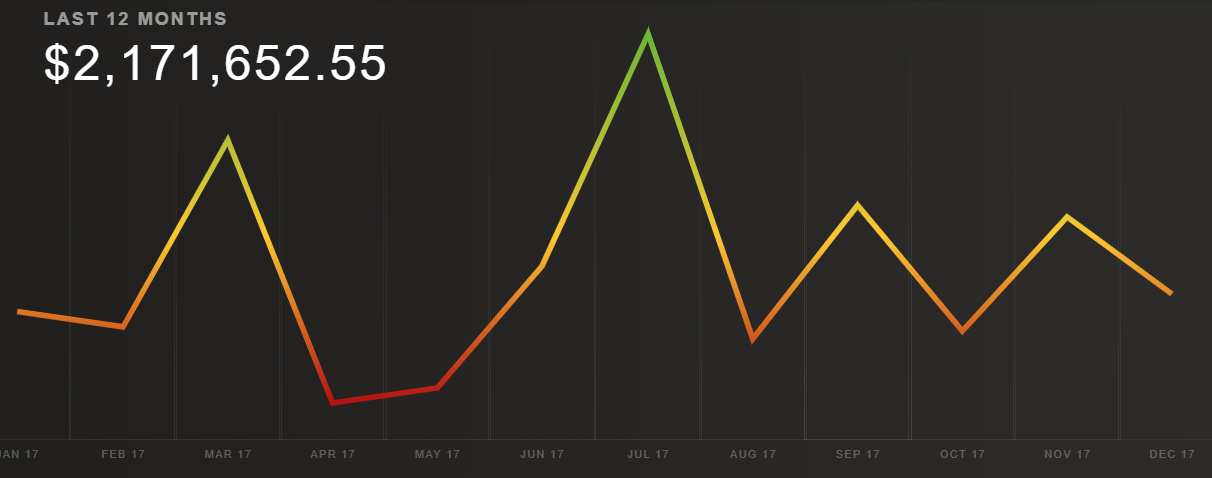
Source: Smartpassiveincome.com

The reason he is earning so much? Because he found an untapped niche and podcasted on it for more than five years consistently. So, you also have to find an untapped niche or even a sub-niche that you are passionate about but people aren’t talking about it.

Make a Monetization Model

Once you have found a niche for your business, create a monetization model to that you can use to make your podcast lucrative. Because if it isn’t profitable you may lose interest in producing more of the content.

On an average, most podcasts will become profitable in a year or so – when they become known in the market.

But a few people can actually make their podcasts profitable even before they start promotion. Take gaps.com owner, Glen Allsopp. Even before starting a podcast, Glen started selling his podcast slots. He was selling a single 30 second slot for $50. First 40 people he reached out to said they weren’t interested. But the 41st person bought slots in two episodes, making him $100 in just 11 hours. Read about his full experiment here.

The crux of this story? Think out of the box. Think some ways in which you can actually earn even before your start podcasting. This will not only keep you motivated, but it will also keep you financially satisfied.

Create a Calendar – Add Epic Content

While recording podcasts is easy, creating meaningful podcasts is hard. Period.

Think of ways in which you are actually helping people. So, select ideas that work and keep them on a single topic. For example, you may like to podcast about ‘Google Monetization Methods.’ So, your ideal topic series should be somewhat like:

  • Intro to Google Monetization Methods
  • How to Run an Adsense Blog
  • Start Your App Account and Monetize with Admob
  • Create a YouTube Channel and Monetize it
  • Can You Monetize Google Smart Speaker?

So on and so forth…

If the topics are more in-depth, you can break them into chapters and series so that your audience can listen to them one by one.

You may need to create cover art for your podcast as well.

Find a Podcast Hosting (List of top 5)

Here is a list of the best podcasting hosting services. Most of them are completely free.

Google Play: Google play offers podcast hosting service in a selected-few companies. You can get the full list of companies available here.

Apple iTunes: Apple iTunes offers complete podcast hosting service. In fact, you can also monetize your podcast with iTunes. Read more about its details.  

Podbean: Podbean is another great service that lets users host at least 5 hours of podcasting content for free. The service also allows distribution of podcast content on multiple services.

Soundcloud: Soundcloud is completely free. In fact, it is an audio social media sharing site where you can add your podcast for free. However, you will have to distribute it to other places yourself.

Amazon S3: You can also host your podcasts on Amazon simple storage service. But storage service isn’t free and you will be charged $0.023/GB.

Get Started!

That’s all you needed to know about starting your own podcast. Now it is time you get started with making your first podcast. Start marketing it and learn along the way.

How To Market Your Business Using Social Media

By Leigh Burke on April 17, 2019

(Instagram, Twitter, YouTube, Facebook, LinkedIn, Medium.com)

The effective use of social networking sites can significantly help your company to improve its public image and make it more accessible to your clients. Having public profiles accessible to your clients and potential customers gives your business a chance to interact with its customers like never before. The use of social networking sites will significantly improve the reach and visibility of your business and services, at little or no cost to your business. You will have more chances to introduce new products and services, while simultaneously being able to receive feedback on whether the ideas are working or not.

Here’s a guide on marketing your business using some specific platforms:

Instagram

  • Set Up Your Instagram Account
  • Sign up on the Instagram app (It comes as a personal Instagram account).
  • Switch to a business account (Go to settings in your profile and tap ‘switch to business profile’, add your contact information and tap ‘done’).

Create A Strategy

  • Define Your Target Audience
  • Figure out who already buys from you.
  • Do your research and understand what kind of contents your audience wants from you.
  • Find out how they interact with other similar brands and your competitors.
  • Set SMART (specific, measurable, attainable, relevant and timely) goals related to business objectives. Goals could be in term of numbers of likes, follows, and comments.
  • Commit to a regular posting schedule.
  • Achieve Maximum Visual Aesthetic For Your Brand (Instagram is all about visuals)
  • Go for a consistent visual look. (consistent colors and filters, visual aesthetic among contents).
  • Take and post amazing photos.
  • Edit your pictures like a pro (or get a pro to do it).
  • Write compelling captions.
  • Grow and Engage Your Audience
  • Engage and follow similar Instagrammers.
  • Use Instagram tools correctly (hashtags, stories, tags, e.tc).
  • Respond to relevant comments and mentions.
  • Use Instagram Influencers and Ads to promote your business.
  • Promote your account on other channels.
  • Track your progress.

Twitter

  • Get Started
  • Pick a nice twitter handle to username related to your business name.
  • Choose a captivating profile picture. (Your business logo is best).
  • Pick an eye-catching image for your header photo (Pictures of; your product, your team or a one relating to your brand personality).
  • Create a cool and descriptive bio. Use brand related keywords.
  • Build Your Community
  • Follow and engage with people (your customers, informative users, colleagues, related influencers, related businesses).
  • Post! Post!! Post!!!
  • Post short and sweet things.
  • Post more frequently. (The more you tweet, the more engagement you get. Thrice a day at spaced intervals is good).
  • Optimize the timing of your tweets (Know when your target audience will be online to check tweets. Timing is very important. Tweets are seen within seconds of posting before expiration).
  • Balance your self-promoting and non-self-promoting tweets. (A 1:3 ratio will do).
  • Have Great Customer Service
  • Have great listening ears.
  • You can have a separate handle for customer service.
  • Keep on tweeting to build your community, reputation, influence, and brand.

YouTube

  • Create a YouTube business channel.
  • Make a research on your target audience.
  • Make a research on your competition. Learn from them too.
  • Learn from channels you love. What captivates you?
  • Upload and schedule your videos
  • Post videos related to your business.
  • Use captivating captions.
  • Make your videos fun and engaging.
  • Optimize your videos for SEO and get more views.
  • Build your subscriber’s list.
  • Engage with people in the comment sections.
  • Optimize your YouTube channel to attract followers.
  • Utilize YouTube Ads to create awareness for your business.
  • Work with YouTube Influencers.
  • Keep on learning and adapting.

Facebook

  • Create an official Facebook account for your business.
  • Set up your profile. Keep it professional but also fun-looking.
  • Know your target audience and what they want.
  • Blend in. Become a part of the community.
  • Don’t try to hard sell.
  • Create a human voice.
  • Post frequently, captivating, engaging, business-related posts.
  • Make sure to encourage and reply to comments.
  • Post attractive pictures and videos too.
  • Let your post end up promoting your business, one way or the other.
  • Have fun.
  • Get interactive with contests, surveys, games, offers. You can create them to improve awareness too.
  • Build good relationships with Facebook users. Your customer is nearby.
  • Promote your Facebook page.

LinkedIn

  • Create a rock-solid profile.
  • Connect with everyone. The larger your expanded network grows, the more opportunities you get.
  • Customize the links to your website.
  • Post valuable content.
  • Post high-quality, captivating, business-promoting videos.
  • Set engagement targets.
  • Create a posting schedule.
  • Liven things up! It’s LinkedIn but you’re not a robot.
  • Give recommendations to others. The more you give, the more you’ll receive.
  • Join and own business-related LinkedIn groups. You can easily spread your message, create awareness, connect with potential customers and partners.
  • Connect your account with Twitter for more engagement.
  • Put up your company profile in the company page section.
  • Focus on your search ranking.
  • Build a good reputation.
  • Market your business, brand, and product.

Medium.com

  • Create a profile with your business name.
  • Add links to your other social media platforms and websites.
  • Study your target audience and what they want.
  • Post quality, attractive business-related contents.
  • Publish regularly
  • Create a posting schedule.
  • Cross-link between contents
  • Follow people who like your posts.
  • Build up your network.
  • Request for sharing of your posts to increase awareness.
  • Attract email leads.
  • Brand your business.

Following these steps, you’re sure to be able to market your business, solidify your brand and move your business to the next level. Use these social media marketing strategies and see what happens. Good luck!

How to Edit Photos in Adobe Photoshop

By Leigh Burke on April 14, 2019

Adobe Photoshop was first launched in 1988 by Adobe Inc. and since then along with other Adobe products, Photoshop has become a stellar photo-editing tool.

With its amazing features and diverse use, there is no doubt that mastering Photoshop in one day is not possible. But starting off with a few basics is not as hard as it sounds.

When I first heard and wanted to learn Photoshop I almost got goosebumps thinking it is a tool that can only be used by masters or genius or artistic people and it is no child’s play. But then I quickly realized that even masters start from the bottom and learning one step at a time can take you a long way.

So here’s a quick tutorial on a few commonly used features with which you can start off your photo-editing journey on Photoshop.

1 – Remove Background
There are many editing tools and each tool can be used for more than one purpose.
But here I will tell you the easiest and cleanest way to remove a Photo Background without a trace using Pen tool.

  • Open the image>file>open
  • Go to left pane>pen tool
  • Unlock the layer
  • Zoom in the image by pressing CTRL and Plus ( +)
  • Start making a selection using pen tool by connecting pen dots. To complete selection connect the last dot with the first pen dot.
  • After making a selection with the pen tool, right click, a new window will open, press  make a selection and hit enter
  • Open a background image or create your own in another window
  • Go to Rose image>Edit>Copy
  • Go to Background window>Edit>Paste or drag the rose to the other window
  • Press CTRL + T to select the image to adjust.
  • Resize Image by simply dragging or dropping the image and keeping pressing SHIFT while you resize. Pressing SHIFT will help to keep the pixels to their original state.


2 – Remove Unwanted Objects
With Adobe Photoshop you can easily remove unwanted objects or spots without ruining the picture.

  • Open Image
  • Go to the left pane
  • Press Spot Healing Tool
  • Unlock the image Layer
  • Press or mark the areas on the picture you want to remove


3 – Adjust Brightness and Contrast
Add color adjustments and make your photo look more beautiful. You can adjust brightness and contrast and make your raw photos look fantastic.

Add color adjustments and make your photo look more beautiful. You can adjust brightness and contrast and make your raw photos look fantastic.

  • Go to right pane> add an adjustment
  • Press Brightness and contrast and adjust by moving scale pointers
  • Press Balance colors to adjust color levels


4 – Add Filters
Adobe Photoshop gives a range of photo filters from its existing gallery. You can also download additional filters from the web. To add filters:

  • Go the top ribbon>Press filters
  • Go to filter gallery, choose from the existing list, or download from the web


5 – Create and Add Watermark
Watermark adds credibility to your work. You can create your own a watermark with Photoshop and apply to your photos by following the below steps below:

  • Go to file>new
  • Adjust size,width, and resolution
  • Click transparent background
  • Go to left pane>text
  • Add watermark text
  • Select crop tool and crop the text
  • Then go to edit>define brush preset>ok
  • Paste/drag the watermark on the picture in the other window

How To Create A Course In Articulate Storyline 3

By Leigh Burke on April 10, 2019

Now you can create and design your own e-learning courses using Articulate Storyline 3. Articulate Storyline was initially launched in 2001 and since then it has almost 19 years of excellence. It is mainly a simple but powerful tool which is jam-packed with most intriguing, time and money saving features, taking the course designing process for eLearning platforms to a whole new level.

Additionally, you will find Articulate Storyline very familiar because it has a similar interface structure as that of Microsoft PowerPoint, giving you the feeling of old but familiar software with a touch of extra functions.

Let’s have a look at the short guide on how can you use some basic features of Articulate Storyline 3 and learn the functions of each mentioned feature.

Create a New Project

After completing the installation process of Articulate Storyline 3, open the application and hit New Project to get started.

Moreover, you can also import media/slides from your desktop or can restart an existing project.

Also, make sure to save your project file in your hard drive for future or re-use.

Storyview

Storyview contains all slides and scenes you create in your course. It appears as a map-like structure and here you can create triggers or link different scenes with each other.

Scenes

Just like a story is a compilation of different scenes, similarly, in Articulate Storyline, you can create scenes on each different slide.

In order to add scenes:

  • Go to storyview and press add new scenes in the  top ribbon
  • When you open a slide, on the left side there appears a scenes pane and you can manage and add new scenes from there as well

Characters

In order to keep your audience’s interest, you need to create engaging content and adding characters not only adds creativity to your content but it can also help your audience to understand and remember points more easily. With Articulate Storyline 3 you can add both photographic and cartoonish characters. You can also change the character’s expression such as happy or shocked and you can change the character’s pose as well, for example, hands at sides or hands crossed.

To add a character:

  • Go to the top ribbon>Insert
  • Press add character
  • A new window will open and from there you can choose your desired character

Timeline

The timeline appears at the bottom of your Articulate Storyline workspace or just below your slide. The timeline contains the order of things you add on each slide. For example, if you add a text box and a character and you want the character to appear first and text later then you can change their position/order in the slide by simply going to the timeline and dragging the character and text up or down.

States

In the states button which is right next to the timeline, you can change the state of text, character or anything else. Yes, you can change/edit states all you want.

For example, let’s say your character can’t solve a math’s problem and normally your character will show a sad/confused face. Then your character solves the problem is now it is happy.

You can set the normal state of character as confused/sad and initial state as happy by using states function.

Player Triggers        

Triggers are link buttons. You can directly jump from one slide or scene to another whether it is backward or forward. Player Triggers are present on the right side of your Articulate Storyline 3 workspace. You can choose a trigger of your choice from the drop-down list and add it.

Slide Layers

Slides layer is another important feature. Just like in Photoshop you can create different layers similarly in Articulate Storyline 3 you can also create multiple layers on each slide. Choose whether you want to show the slide layer or not or how and when the slide layer or objects in the slide should appear.

Slide layers pane appears on the right side and just right below the player triggers. To add new layers you can go the top ribbon>insert>slide layer.

Add Audio/Video/Web Object

You can add existing audio from your desktop or record on the spot using Articulate Storyline 3. Similarly, you can also add an existing video clip or record one by connecting your webcam with the articulate storyline. Now you can create slides and record audio/video at the same time and save your time.

You can also create an embedded video link/code and place it in the slide.

Add Quiz/Survey/Freeform

A course without a quiz is somewhat incomplete. You can easily create quizzes to engage your e-learning audience and test their learning capability by using Articulate Storyline 3. There various quiz templates which you can use according to your liking.

To add a new quiz in a slide:

  • Go to the top ribbon>slides
  • Press Graded quiz, choose a template, add quiz questions, and hit ok

Finish, Save, Preview and/or Publish

  • Once you’re sure you have added all the details finish it, and save it by going to the top ribbon>file>save
  • Before you publish your course you can also preview it in different device formats such as the computer, mobile, tablet, etc to make sure it works fine with all device formats. To preview your course go to the top ribbon>slides>preview
  • After you’re done with your preview test, wrap your course up and finally you can publish it by going to the top ribbon>slides>publish

Articulate Storyline 3 is easy and fun to create courses with. You don’t need to be a genius to create your first project. A little focus and simple drag/drop will certainly teach you more than a lot. So, grab your Articulate Storyline 3 full or trial version, start designing your first project and don’t forget to share your experience.

How To Self Publish Your Book With Amazon Kindle

By Leigh Burke on April 8, 2019

Getting your book published can be a daunting and time-consuming task. Especially for new writers who have yet to attain recognition and make connections in the industry. Writing and crafting a meaningful book is already a lot of hard-work but then getting your book published by meeting a lot of publishers and the fear of rejection is the worst nightmare of a writer.

But hold on. That’s not a problem at all. Because, all thanks to Amazon KDP, now you can easily self-publish your books worldwide whether they’re eBooks or paperbacks within just 5 minutes. In addition, you can also reach millions of viewers, get your book reviews, and make a lot more money with Amazon Kindle Direct Publishing.

So, here we present you an easy guide on how you can publish your book via Amazon Kindle Direct Publishing:

Bookshelf   

First of all, go to the Amazon KDP official website and set up your new account. After signing in, the first thing you will see is Bookshelf.

This tab contains all of your uploaded books, whether they are manuscripts or paperbacks.

Once you choose your desired book upload option, you will have to through the further three steps process by entering book details.

Let’s suppose you want to upload a manuscript. Follow the below steps:

  1. Kindle eBook Details
  2. Enter your book language: currently, Amazon KDP supports 40 different languages.
  3. Enter your Book Title and Subtitle (Optional)
  • If your book is part of series then you can add Series Number to help readers find it more easily
  • Add eBook Edition Number
  • Add the name of the Author of the Book
  • Add names of additional Contributors (if there are any) such as editors, photographers, etc.
  • Write a compelling book Description that defines what the book is about precisely.
  • You canchoose Publishing Rights between owning them yourself or setting them as public domain
  • Add relevant Keywords to help your book appear in the search. You can add up to 7 keywords in each book.
  • If it is an educational or children book then you can add Grade and Age Range
  • Amazon KDP also allow readers to Pre-Order a book before it is actually published
  • Kindle eBook Content
  • Before you upload your manuscript follow the guidelines and abide by them. Moreover, you can also choose whether you want your manuscript to be affected by DRM or not.
  • Amazon also allows you to either create a brand new Kindle eBook Cover using cover creator or upload an already existing cover
  • Amazon Kindleallows you to create an eBook Preview. A book preview is where you can set the visibility of a few pages to your readers to let them decide if the book is worth reading or not.
  • An ISBN is a unique book code.You can use existing ISBN or create a free Kindle eBook ISBN.
  • Kindle eBook Pricing    
  • KDP Select Enrollment
  • Set the Territories to either worldwide or to a specific location
  • Set the  Pricing for your booksand choose your desired royalty plans from 35% or 70% 
  • If a reader has already purchased the hard copy of same or matchbook on Amazon then you can sale its ebook to the same person for a price of $2.99 or less.
  • You can lend your ebook to readers who have previously purchased your book for a period of 14 days
  • Agree to the Pre-order Terms and hit save and publish.

Report

Here in this tab, you can access all your sales reports, promotion and payment and other relevant records for each ebook you have uploaded.

Community

In this tab, you can easily connect with other authors, stay updated with recent announcements, access feedback and report your or resolve your KDP account issues.

KDP Select

KPD Select is an additional promotional tool for people who publish and sell their books. It allows reaching an unlimited audience, to earn maximum royalties, etc.  Anyone can enroll in KDP Select who meets the eligibility criteria and the enrollment is absolutely free of cost.

Amazon is one of the most popular and trusted site where millions of people sell and buy products every day. Provided benefits and ease of Amazon KPD for its users, we conclude that the authors should definitely give it a shot.

How To Record Your Screen Using Camtasia

By Leigh Burke on April 3, 2019

Screen-recording or screen-casting is used to record instructional tutorial videos, mostly for educational purposes. Now with the help of Camtasia Studio, you can create screen-recordings for your online courses, YouTube tutorials and much more with a touch of extra features.

Camtasia Studio is a popular screen-casting tool as it is super easy to use and it comes along with lots of additional video editing options. But no matter how easy it may seem to use a tool/software, it is always a good idea to do a little background research before you actually get started and to wind up your time. 

So, let’s take you through a step by step guide to make your first screen-casting experience easy.

Step1: Record Screen

You can record your screen both in windows laptop or mac using Camtasia Studio.
To do that:

  • Open Camtasia studio
  • Go to the top left corner
  • Hit on record Screen

An additional new window will open, which will look like the one in the screenshot below.

Adjust your recording preference and tap on the red colored Rec button. And to stop your screen-recording simply press F10.

Import Media

You can import files such as images, videos, audio, etc. from your PC as well from Google Drive.

  • Go to Top ribbon
  • Tap on Import media

Record Webcam

The best and our most liked feature of Camtasia Studio is Webcam recording.

Yes, you hear it right, now you don’t need to create separate personal video recording. Record your screen and yourself at the same time to create an engaging user interface experience.

  • Go to center ribbon; just above your timeline
  • Tap on record camera
  • Adjust your preferences of audio/video and press ok

Add Transition Effects

You can also add pre-built or themed templates, transition effects or animations just by simply using drag or drop functions.

  • Tap on Add Transition
  • Choose your desired Transition effect
  • Drag/drop the transition into your timeline
  • Preview your transition in the preview pane to check if it looks fine

Add Audio/Video Effects

You can add or adjust audio/video settings. There is also a pre-built library in the Camtasia studio and from there you can find or add audio/music, video effects, templates, themes, and other related material.

Add Callout

Add pre-built or customized call outs to grab and hook the attention of your audience.

  • Tap on callout
  • An additional window will open on the right of the preview pane
  • Choose callout shapes, add text, borders, effects and press ok

Add Quizzes

If you are creating course videos, then adding quizzes is a very important and necessary step. With Camtasia Studio you can also add quizzes or quiz questions to your screencast.

  • Go to and tap on Quizzes option
  • An additional window will open
  •  Create quiz questions and answer options and press ok

Customize Video Size

You can also adjust or customized your screencast video size and quality.

  • On the top ribbon and tap on 1278×270
  • An additional window will open and from there you can adjust the length, width, and quality of your video

Share your Screencast

Once you’re done with creating your project, you can share your screencast video directly from Camtasia studio to online forums such as YouTube, Vimeo and screencast dot com.

  • Simply press produce and share button
  • Choose sharing forum and press ok

Or you can save the video into your pc library by going to File>Save As on the top ribbon.

With all the above discussed points, we conclude Camtasia Studio is a use screencast tool because of its ease to use and plenty of pre-built editing tools and especially webcam recording. Also to use Camtasia Studio you don’t need to be a genius or an expert, anyone can do create screencasts using it with just a little effort.

  • « Go to Previous Page
  • Page 1
  • Interim pages omitted …
  • Page 14
  • Page 15
  • Page 16
  • Page 17
  • Page 18
  • Go to Next Page »

Primary Sidebar

SEARCH TRAINING GUIDES

FREE COPY OF TRAINING PROFITS MANIFESTO

Oh hi there 👋 It’s nice to meet you.

Fill in your first name and email address below and click ‘SEND ME MY COPY NOW’ to claim your free copy of the Training Manifesto.

We don’t spam! Read our privacy policy for more info.

Check your inbox or spam folder to confirm your subscription.

Categories

  • Training Profits Manifesto
  • Our Courses
  • Free Guides
  • Terms & Conditions
  • Privacy Policy
  • Contact Me
  • Socials

Cart

Copyright © 2025 · TrainingProfits.com · Log in